Buenos días! Hoy os voy a mostrar un proyecto muy especial, y muy útil también. Este es un poquito más grande de lo habitual, jeje....habeis oído hablar de las torres de aprendizaje? Se basan en la pedagogía Montessori y sirven para adaptar las alturas de la casa al niño, así puede ponerse a nivel de la encimera y "ayudarnos" con las tareas.
Hi! Today I'm going to show you a really special project, and very useful too. This is bigger than usual...have you ever heard about learning towers? They are based on Montessori pedagogy and they're used to adapt house levels to the children, so they can "help" us with some chores.
Es un invento genial, pero las originales son muy caras, así que investigando un poco por internet decidimos hacer una nosotros mismos con un taburete del Ikea y unos listones de madera que teníamos por casa.
Es muy sencillo, en esta web tienes todas las instrucciones:
http://www.maminatura.com/blog/es/diy-fabricando-una-torre-de-aprendizaje/ It's a great invention, but original ones are too expensive, so doing a little research on the internet we decided to do our own learning tower with an Ikea stool and some recicled wood strips. It's really easy, you have all the instructions here: http://www.maminatura.com/blog/es/diy-fabricando-una-torre-de-aprendizaje/
Luego, para que quedara mejor, como la hice con listones reciclados de varios sitios yo la forré con papel adhesivo, y este es el resultado, mirad que útil:
At the end,to make it look better, I covered it with adhesive paper and you can see the result below:
Y aquí os dejo un video para que la veais mejor. Al principio Leo no sabía subir, pero solo le llevó un par de días y cogío la técnica enseguida para subir y bajar.
Here you have a video to see it better. At first Leo didn't know how to climb himself up, but it only take him a couple of days to learn how to climb up and down.
La verdad es que la usamos muchisimo y nos lo pasamos genial cocinando juntos! Para mí se ha convertido en un imprescindible, os animo a fabricar una y vereis.
Hasta la próxima!!
We use it a lot and have lots of fun cooking together. For me it is now a "must have". I encorage you to make your own. See you soon!
Hoy quería mostraros una cosa muy especial, mi gran proyecto del año pasado. Al fin está aquí!!!!Es un libro tranquilo, es decir, un libro con actividades para que aprendan y se entretengan. Tiene un asa para poder llevarlo como una maletita.
Hi!! Today I wanted to show you a super special craft, my big last year proyect...it's already here!!! It's a Quiet Book, a book with a lot of activities to entertain kids and to learn things too. It has a handle to carry it as a little bag.
Esta hecho en fieltro y tiene varias hojas, con diferentes actividades, pensadas cada una para que aprendan una cosa y desarrollen una habilidad.
It's made of felt and has several sheets, with different activities, all of them thought to learn something and to develop an ability.
En la tapa puse una foto suya. Y en la primera página se trata de aprender las formas básicas, tiene diferentes formas que se sacan y se ponen en su sitio con velcro, tienen que quedar bien colocadas, sino no vale!: In the inside cover there is a photo of Leo. And the first page is about learning the basic shapes. It has different shapes that you can take out and put in the right place with velcro. You have to put them right into the outline!!
La siguiente página es para jugar a las marionetas, tiene varios animales que se pueden guardar en el establo, poner en diferentes puntos de la pagina que simula el campo o colocar en el dedo para jugar. A Leo le encanta ponerlos a dormir y encerrarlos, jeje
The next page is about puppets, it has several animals that you can keep into the barn, stick them in the right places on the next page (that is a field) or put then on your finger to play. Leo loves to put them to sleep, hehe
Las dos páginas siguientes tienen una carretera, se trata de conducir el coche por la carretera hasta el garaje sin salirse, además hay una gasolinera para repostar y un par de casas para visitar.
The next two pages have a road. You have to drive the car along the road untill the garage, following the road. There is also a petrol station and a couple of houses to visit.
La siguiente es el típico muñeco al estilo Mr. Potato, con muchos ojos, bocas, etc. que puedes combinar como quieras para hacer diferentes caras.
The next one is like Mr. Potato, there are a lot of different eyes, mouths, etc. you can combine as you prefer to make different faces.
Esta es la página preferida de Leo de momento, la de los colores.
This one is Leo's favorite page, the colors page.
Estas dos páginas siguientes están relacionadas, y son para aprender a contar. La idea es ir quitando y poniendo las manzanas del árbol y mover los patitos correspondientes en la página de la derecha. El pájaro también se puede mover!
This two pages go together, and are tought to learn to count. The idea is to keep some apples into the basket, so you can count with the little ducks on the right. You can move the little bird too!
El caracol tiene en su concha un laberinto, hay que llevar el cascabel hasta el centro. Además nos vale para que siempre que llegamos a esta página hay que cantar la canción del "caracol, col, col...."
The snail has a maze in the shell, so you have to move the bell to the center. Always we reach this page we have to sing the snail song.
Y por último un reloj, pero esta Leoes todavía demasiado pequeño...
And the last one, the clock. But Leo is still too little for this one.
Lo bueno es que las hojas se pueden poner y quitar y puedo hacer más según vaya creciendo y pueda realizar actividades más complejas. De momento escogí actividades sencillas, que pudieran entretenerle, sobre todo de cara a los viajes largos
The best is that you can add or take away the sheets, and I can always make different ones to add as Leo grows up and needs more complex activities. For the moment I chose easy ones, to entertain him, especially in long trips.
La verdad es que me costó muchísimo tiempo y pinchazos hacerlo, pero solo por ver la carita que puso cuando lo vio y lo que se entretiene con él vale la pena.
I needed a lot of time and work to make it, and I poked my skin more than once, but when I saw his face when he saw it and the time he spends playing with it worths everything.
Y aquí podéis ver un vídeo donde se ve mucho mejor todo:
And here you can watch a video so you can see everything better:
Eso es todo de momento, espero que os haya gustado, y esto no acaba aqui, porque ya tengo en mente otro gran proyecto para este nuevo año, solo tengo que conseguir algo de tiempo para llevarlo a cabo.
Nos vemos en la próxima entrada!!
This is all for now, I hope you like it. But I already have a new big proyect in my mind for this year, I just need some time to do it.
Hola a todos!! Aunque tengo muchas cosas pendientes que enseñaros, este puede que sea mi ultimo post del año, pero me hace especial ilusión hoy enseñaros las maripositas, que ya están todas "volando" a sus pequeños destinatarios!
Como mañana es el cumple de Leo, hoy lo celebra en la guarde con sus compañeros, así que además de la tarta me apetecía hacer unos regalitos para los peques. No quería tampoco complicarme mucho, porque no tengo nada de tiempo, y aquí tenéis el resultado:
Hi everybody! Despite I have a lot of things to show you yet, this is surely my last post of the year, but today I really wanted to show you these little butterflies, that are already "flying" towards their little addresses!
As tomorrow is Leo's birthday, today he is celebrating with his nursery mates, so besides the traditional cake I wanted to prepare some presents for the children. I didn't want to make anything very complicated, because I don't have any spare time right now. And here you can see the result:
Primero hice una prueba para ver como quedarían y me gustó así que me puse manos a la obra...
First I made a prototype and I liked it, so I got started...
Es muy sencillo: primero se recortan los cuerpos de las mariposas en cartulinas de colores, necesitamos dos por mariposa. Luego les pinté los ojitos. Enrollando papel de revista hice unos cuernecillos y los pegué en cada mariposa con cola blanca de manualidades:
It's really easy: first you have to cut the butterflies' bodies using colored cardboards. You need two bodies for each butterfly. I painted little eyes. Rolling magazine paper I did the little horns and I glued them to each butterfly with white craft glue.
Después solo tenemos que rellenar una bolsa de congelar con cierre zip con lo que querais (en este caso gusanitos, nubes y monedas de chocolate) la arrugais en el medio y la grapais entre las cartulinas.
Por último pegamos la cola y escribimos el nombre y la fecha como recuerdo.
Y aquí está el resultado....¿os gusta?
And finally you only have to fill freezer bags with everything you want (in this case I used corn snacks, marshmallows and chocolate coins), crumple in the middle and staple them in the middle of the boards.
To finish we glue the tail and write the name and date on it. Here is the result....Do you like it?
Pues con esto me despido hasta el año que viene, os deseo Feliz Navidad, que disfrutéis mucho las fiestas con vuestra gente y que 2017 venga cargado de felicidad y cosas buenas.
¡¡¡Besos!!
With this I say goodby, till next year. I wish you all Merry Christmas, I hope you really enjoy your holidays with your people and I hope that 2017 will come full of hapiness and good things.
Siento no actualizar todo lo frecuentemente que me gustaría el blog, pero ahora estoy en un periodo que me es imposible, y es una pena porque tengo muchas cositas por ahí pendientes que enseñaros, pero bueno, ya vendrán tiempos mejores!
De hecho ahora mismo estoy trabajando en un super-proyecto en el que ya llevo varios meses y espero acabar muy pronto...¿habéis oído hablar alguna vez de los "Libros Tranquilos"? es un regalo de Navidad para Leo, así que más me vale!! jeje Yo estoy entusiasmada, está quedando genial, y creo que va a ser muy útil además.
Pero bueno, de momento hoy os muestro este cuadro que hice ya algún tiempo...¿que os parece? El arte abstracto en general es complicado, a mi personalmente muchas veces no me gustan muchas cosas que veo por ahí, pero este no se porque me resulta bonito, además cada persona lo interpreta de forma diferente, y es muy divertido...¿os sugiere algo concreto?
Hi again!
I'm really sorry but I can't write as frequently as I would like. Nowadays it's impossible for me, and it's a pity because I still have a lot of things to show you, but anyway, I'm sure better times will come.
In fact right now I'm preparing a super-project in which I've been working several months ago and I hope to finish it very soon...Have you ever listened about " Quiet Books"? It's going to be a Christmas present for Leo, so I better do it! jeje I'm thrilled about it, it's becoming wonderful, and besides, I think it's going to be really useful.
But anyway, today I wanted to show you this painting that I did some time ago...¿what do you think? Abstract art is usually a complicated issue, personally I often don't like many things I see, but I do like this one, and moreover each person interprets it in a different way so it's very funny...¿does it suggest you something?
Bueno, hasta la próxima, que espero que sea antes de Navidad!!
Well, see you soon (I hope to be able to write something before Christmaas!!)
Hola!! Vuelvo a estar por aquí. He tenido que espaciar las actualizaciones porque no tengo demasiado tiempo ahora mismo, pero bueno, poquito a poco, espero sacar un ratillo para ir poniendo cosas.
Hoy os traigo un "invento" Frozen que hice para dos princesitas de verdad.
Hi! Here I am again. My posts are less frequent because I haven't got much time right now, so I have to take it easy, but I hope to find always some little time to show you my things.
Today I show you a Frozen's creation I made for two little princesses.
Son dos marionetas de las princesas Frozen que se pueden acoplar a una diadema, así les valen de adorno para el pelo y para jugar un rato
They are two puppets that can be assembled on a hairband, so they can wear them on their hair or take them out to play .
Y aquí están las dos, tan monas ellas con sus diademas...y se lo pasaron en grande jugando con ellas!
And here they are, soooo cute with their hairbands...and they played a lot during the meal!!
Que paséis un feliz verano todos y os veo en la próxima entrega!
Hola, ya estoy de nuevo por aquí, que con tantas vacaciones se me va el santo al cielo!
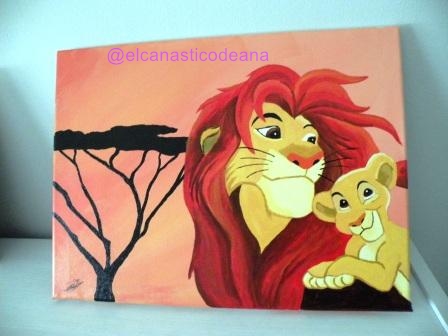
Hoy os quería enseñar otro cuadro. Este es el segundo que hago para la habitación de Leo, junto con el del Rey León. Este no está pintado, sino que lo hice con una técnica mixta de fieltro y papel.
Hi! Here I am again. Today I wanted to show you another painting. This is the second one I made for Leo's bedroom,. This one is not painted, but made with a felt and paper technique.
No se si se puede ver muy bien en las fotos, pero el marco es el Ribba (del Ikea), que es profundo y lleva el cristal en la parte de delante, así se pueden colocar dentro elementos con volumen (como las letras de fieltro, que son rellenas).
I don't know if you can see it well in the photos, but the frame is called Ribba (from Ikea). It's quite deep and you can place the glass in the front part, so you can put thick elements inside (like the felt letters).
Este verano quería pintar un cuadro para la habitación de Leo, y como no podía ser de otra forma elegí esta imagen del Rey Leon, que le queda perfecto. Este fue mi primer cuadro " a pelo", es decir, sin seguir ningún tutorial, sino cogiendo una foto e intentándola reproducir, y la verdad es que estoy muy satisfecha del resultado.
Aqui podeis ver como fue un poco el proceso, a la primera parte mas o menos....
This summer I wanted to paint a painting for Leo's bedroom, and it had to be the Lion King, of course. It fits perfectly in his room. This was my first painting on my own, without the help of any tutorial, and I'm pretty satisfied with the result.
Here you can see the process, this photo taken in the middle....
Y el resultado final....tachaaaaaaan:
And the final result!!!!
Os gusta? al final le voy a coger el gusanillo a esto de la pintura! :-)
Do you like it? At the end, I'm going to get hooked on painting!
Hola! Feliz año a todos, espero que lo hayáis comenzado de la mejor manera posible. Ya estamos de vuelta con nuevas cositas
Hoy estaba mirando a mi pequeño y me daba cuenta lo rápido que pasa el tiempo, ya ha cumplido un añito y pronto le tendré que quitar el chupete (ahora ya intento que solo lo use para dormir...)
Aquí os enseño los tres chupeteros que le hice antes de nacer, en fieltro, que todavía no los había colgado. De tres colores y estilos diferentes, para poder combinarlos según la ropa que lleve puesta.
Hi and Happy New Year to everybody! I hope it started as good as possible. We're already back with new things.
Today I was looking at my little boy and I realized how fast time goes by, he's already one year old and soon I'm going to take away his pacifier (nowadays he only uses it to go to sleep...)
Here I show you the three felt pacifier clasps I did for him before he was born, I hadn't posted them yet! They're made in three colors and different styles to combine them depending on the clothes of each day.
Buenos días a todos. Esta creo que va a ser la ultima entrada del año...porque ya estamos en Navidad!!! Increíble, como pasa el tiempo de rápido, no? Pensando en esto del tiempo hoy me di cuenta que mi peque está a punto de cumplir un añito, y parece que fue ayer cuando le vimos la carita por primera vez! y me he puesto un poco nostálgica...
Por eso os traigo aquí uno de las mejores manualidades que he hecho, sin duda una de las más útiles: mi collar de lactancia. Al principio tuve bastantes problemas con la lactancia (es más difícil de lo que nadie te cuenta!!) y este collar me ayudo mucho, porque Leo me arañaba mucho y cuando me puse el collar se quedaba agarradito y estaba mucho más tranquilo.
Hi everybody. I think that this is going to be my last post this year , because Christmas is already here! It's incredible how fast time passes by, isn't it? Thinking about this I realized that my little boy is almost a year old now and it seems like it was just yesterday when we saw his face for the first time! And I got a bit nostalgic...
So I wanted to show you one of the best handycrafts I have ever made, at least one of the most useful: my breastfeeding necklace. At first I had problems with breastfeeding (it's more difficult than everybody tells you!) and this necklace helped me a lot, because Leo scratched me all time and when I put it on, he grabbed it and he
was much more calmed.
Además es supersencillo de hacer, solo se necesita un rollo de trapillo y ya esta, se teje con los dedos en un momento. Aquí tenéis el vídeo de "Cosicasderaquel" donde lo explica perfectamente, para quien se anime a hacerse uno.
Besides, it is super easy to do, you just need the fabric and it is all, you knit it with your fingers in a minute. Here you have the video tutorial where it is explained clearly, in case you want to do your own necklace.
Bueno, espero que os sirva de ayuda.
Feliz Navidad a todos y prospero año 2016, pronto nos vemos por aquí con más cositas!!
Well, I hope it help you.
Merry Christmas and Happy New year 2016, see you soon with more things here!!
Ay, hacia mucho tiempo que no ponía una entrada del Canastico digital! Es que últimamente tengo mucho lio, pero bueno, siempre saco un ratillo para las cosas que más me gustan...y una de ellas es esta: retocar fotos!!
La verdad es que a veces es una pena, que alguna fotos bonitas no queden muy bien por alguien que pasaba o un fondo no muy apropiado.
En este post os muestro dos técnicas diferentes muy sencillas. La primera, simplemente difuminar algo el fondo que no nos interesa:
wow, it's been really a long time since I didn't publish something in "El Canastico digital"! I've been so busy lately, but I always find some time to do the things I like, as working with photographs
Sometimes it's a pity that a photo you like is spoiled because someone was walking around or there isn't a nice background. In this post I show you two very simple techniques. The first one is to blur what you are not interested in.
Antes
Despues
Simplemente con la pluma seleccionamos con cuidado la parte que nos interesa, cerramos la selección, seleccionamos el inverso y le aplicamos un desenfoque (aquí además yo le quité el color)
With the pen tool we select what we want, we close the selection, invert the selection and apply a blur filter (here I removed the color also).
O también directamente coger la parte que nos gusta de la foto y "colocarla" en un fondo más bonito:
You can directly take the part you like in the photo and place it in a nicer background:
Antes
Después
Y ya aquí le podemos echar imaginación, por ejemplo aquí le apliqué una distorsión al azar y me pareció un resultado divertido:
And you can play too, for example in this case I applied a random distorsion and the result was pretty funny, wasn't it?
Yo utilizo mucho sobretodo la primera técnica, cuando son primeros planos en los que la persona ha quedado bien pero el fondo no nos dice nada, o incluso nos estropea la foto.
I use the first technique a lot when the foreground is ok but the background is botching the photograph.
Bueno, espero que te gusten y te animes a mejorar tus fotos. Hasta la próxima!!!
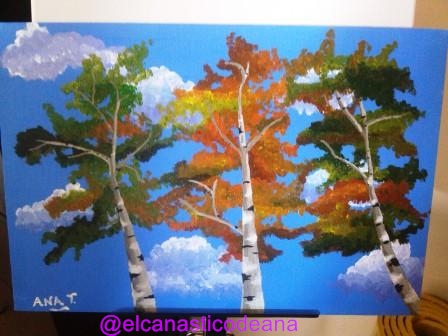
Hoy en el Canastico cambiamos de tercio. Ahora hace poco mas de un año que me regalaron un set de pinturas acrilicas, con caballete incluido!
Yo nunca antes habia pintado nada sobre lienzo, pero he descubierto desde entonces gracias a unos estupendos tutoriales de youtube un mundo maravilloso. Me encanta pintar y además es una actividad que me relaja mucho.
Estos son mis tres primero cuadros, que por supuesto hice siguiendo sendos tutoriales que teneis abajo, para quien se quiera animar.
Today I'm going to talk about a completely different activity. About a year ago I was given an acrylic painting set, even with a fantastic easel. I'd never painted before (at least not on a canvas), and I've discovered a new wonderful world of possibilities thanks to some great tutorials on youtube. I love painting and it's also an activity which relax me a lot.
These are my first three paintings (of course I made them following tutorials you can find in youtube, so I'm going to write the internet adress, just in case some of you want to try!)
Este de arriba fue el primero, parece quizás mas complejo de lo que es, pues el degradado (que no me salió muy bien, pero para ser mi primera vez estoy contenta) es una técnica bastante sencilla.
Y el tutorial para principiantes:
This one above was my first one, and maybe it seems more difficult than it is because the technique is quite easy (although it could have been better, for my first time I'm quite happy)
El segundo tenía que ser un ojo...siempre me ha encantado dibujar ojos por todos los lados, con boli y lapiz, pero claro, esto tiene una técnica totalmente diferente. No me gusta el sombreado del parpado, pero para ser mi primer ojo no esta mal, no?
Aqui seguí un tutorial para oleo, pero al final es parecido:
My second one had to be an eye...I've always enjoyed drawing eyes everywhere, with pen or pencil, but of course, this required a completely different technique. I don't like the shading on the eyelid but, as I said, this was my first eye, it doesn't look too bad, does it?
I followed an oil painting tutorial, but it works on acrylic too: