domingo, 17 de enero de 2016

3 chupeteros para Leo/ 3 pacifier clasps for Leo

Hola! Feliz año a todos, espero que lo hayáis comenzado de la mejor manera posible. Ya estamos de vuelta con nuevas cositas
Hoy estaba mirando a mi pequeño y me daba cuenta lo rápido que pasa el tiempo, ya ha cumplido un añito y pronto le tendré que quitar el chupete (ahora ya intento que solo lo use para dormir...)

Aquí os enseño los tres chupeteros que le hice antes de nacer, en fieltro, que todavía no los había colgado. De tres colores y estilos diferentes, para poder combinarlos según la ropa que lleve puesta.


Hi and Happy New Year to everybody! I hope it started as good as possible. We're already back with new things.
Today I was looking at my little boy and I realized how fast time goes by, he's already one year old and soon I'm going to take away his pacifier (nowadays he only uses it to go to sleep...)

Here I show you the three felt pacifier clasps I did for him before he was born, I hadn't posted them yet! They're made in three colors and different styles to combine them depending on the clothes of each day.


Espero que os gusten, y hasta la próxima!! 

Hope you like it and till next time!!

viernes, 18 de diciembre de 2015

Collar de lactancia / Breastfeeding necklace

Buenos días a todos. Esta creo que va a ser la ultima entrada del año...porque ya estamos en Navidad!!! Increíble, como pasa el tiempo de rápido, no? Pensando en esto del tiempo hoy me di cuenta que mi peque está a punto de cumplir un añito, y parece que fue ayer cuando le vimos la carita por primera vez! y me he puesto un poco nostálgica...

Por eso os traigo aquí uno de las mejores manualidades que he hecho, sin duda una de las más útiles: mi collar de lactancia. Al principio tuve bastantes problemas con la lactancia (es más difícil de lo que nadie te cuenta!!) y este collar me ayudo mucho, porque Leo me arañaba mucho y cuando me puse el collar se quedaba agarradito y estaba mucho más tranquilo.


Hi everybody. I think that this is going to be my last post this year , because Christmas is already here! It's incredible how fast time passes by, isn't it? Thinking about this I realized that my little boy is almost a year old now and it seems like it was just yesterday when we saw his face for the first time! And I got a bit nostalgic...


So I wanted to show you one of the best handycrafts I have ever made, at least one of the most useful: my breastfeeding necklace. At first I had problems with breastfeeding (it's more difficult than everybody tells you!) and this necklace helped me a lot, because Leo scratched me all time and when I put it on, he grabbed it and he
was much more calmed.


Además es supersencillo de hacer, solo se necesita un rollo de trapillo y ya esta, se teje con los dedos en un momento. Aquí tenéis el vídeo  de "Cosicasderaquel" donde lo explica perfectamente, para quien se anime a hacerse uno.


Besides, it is super easy to do, you just need the fabric and it is all, you knit it with your fingers in a minute. Here you have the video tutorial where it is explained clearly, in case you want to do your own necklace.


Bueno, espero que os sirva de ayuda.

Feliz Navidad a todos y prospero año 2016, pronto nos vemos por aquí con más cositas!!

Well, I hope it help you.

Merry Christmas and Happy New year 2016, see you soon with more things here!!

martes, 1 de diciembre de 2015

Mejora el fondo de tus fotos / Improving your photo's background

Ay, hacia mucho tiempo que no ponía una entrada del Canastico digital! Es que últimamente tengo mucho lio, pero bueno, siempre saco un ratillo para las cosas que más me gustan...y una de ellas es esta: retocar fotos!!

La verdad es que a veces es una pena, que alguna fotos bonitas no queden muy bien por alguien que pasaba o un fondo no muy apropiado.

En este post os muestro dos técnicas diferentes muy sencillas. La primera, simplemente difuminar algo el fondo que no nos interesa:


wow, it's been really a long time since I didn't publish something in "El Canastico digital"! I've been so busy lately, but I always find some time to do the things I like, as working with photographs

Sometimes it's a pity that a photo you like is spoiled because  someone was walking around or there isn't a nice background. In this post I show you two very simple techniques. The first one is to blur what you are not interested in.

Antes

Despues

Simplemente con la pluma seleccionamos con cuidado la parte que nos interesa, cerramos la selección, seleccionamos el inverso y le aplicamos un desenfoque (aquí además yo le quité el color)

With the pen tool we select what we want, we close the selection, invert the selection and apply a blur filter  (here I removed the color also).

O también directamente coger la parte que nos gusta de la foto y "colocarla" en un fondo más bonito:

You can directly take the part you like in the photo and place it in a nicer background:

 Antes

 Después

Y ya aquí le podemos echar imaginación, por ejemplo aquí le apliqué una distorsión al azar y me pareció un resultado divertido:

And you can play too, for example in this case I applied a random distorsion and the result was pretty funny, wasn't it?


Yo utilizo mucho sobretodo la primera técnica, cuando son primeros planos en los que la persona ha quedado bien pero el fondo no nos dice nada, o incluso nos estropea la foto.

I use the first technique a lot when the foreground is ok but the background is botching the photograph.

Bueno, espero que te gusten y te animes a mejorar tus fotos. Hasta la próxima!!!

Well, I hope you like it and see you soon!!


miércoles, 4 de noviembre de 2015

Vamos a pintar / Let's paint!

Hoy en el Canastico cambiamos de tercio. Ahora hace poco mas de un año que me regalaron un set de pinturas acrilicas, con caballete incluido! 
Yo nunca antes habia pintado nada sobre lienzo, pero he descubierto desde entonces gracias a unos estupendos tutoriales de youtube un mundo maravilloso. Me encanta pintar y además es una actividad que me relaja mucho. 
Estos son mis tres primero cuadros, que por supuesto hice siguiendo sendos tutoriales que teneis abajo, para quien se quiera animar.

Today I'm going to talk about a completely different activity.  About a year ago I was given an acrylic painting set, even with a fantastic easel. I'd never painted before (at least not on a canvas), and I've discovered a new wonderful world of possibilities thanks to some great tutorials on youtube. I love painting and it's also an activity which relax me a lot.
These are my first three paintings (of course I made them following tutorials you can find in youtube, so I'm going to write the internet adress, just in case some of you want to try!)


Este de arriba fue el primero, parece quizás mas complejo de lo que es, pues el degradado (que no me salió muy bien, pero para ser mi primera vez estoy contenta) es una técnica bastante sencilla.

Y el tutorial para principiantes:

This one above was my first one, and maybe it seems more difficult than it is because the technique is quite easy (although it could have been better, for my first time I'm quite happy)
You can find the tutorial for beginners here:

https://www.youtube.com/watch?v=ZvwuNuSdIXk&list=PLb1Z5NKLR-DkZw--G9UxRtH0gYrVJeQh0&index=8


El segundo tenía que ser un ojo...siempre me ha encantado dibujar ojos por todos los lados, con boli y lapiz, pero claro, esto tiene una técnica totalmente diferente. No me gusta el sombreado del parpado, pero para ser mi primer ojo no esta mal, no?
Aqui seguí un tutorial para oleo, pero al final es parecido:

My second one had to be an eye...I've always enjoyed drawing eyes everywhere, with pen or pencil, but of course, this required a completely different technique. I don't like the shading on the eyelid but, as I said, this was my first eye, it doesn't look too bad, does it?
I followed an oil painting tutorial, but it works on acrylic too:

https://www.youtube.com/watch?v=M3uXCQwcicw&list=PLb1Z5NKLR-DkZw--G9UxRtH0gYrVJeQh0&index=2


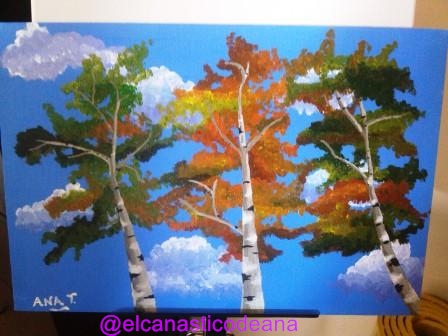
Y por ultimo mi tercera obra, como no unos abedules. Me encanta este árbol, con su corteza tan blanca.

aqui podeis encontrar el tutorial

And the last one, some birch trees...I love those trees, with their white bark. You can find the great tutorial here:

https://www.youtube.com/watch?v=hVlbvkFUzqw&list=PLb1Z5NKLR-DkZw--G9UxRtH0gYrVJeQh0&index=20


Bueno pues aquí estan juntitas mis tres primeras creaciones con pincel, ahora solo me queda encontrar un sitio donde colgarlas!

You can see my first three paint brush creations, now I only have to find where to hang them!

viernes, 25 de septiembre de 2015

Caution: Leo and Abby on board

Hoooola!! Ay que me despisto y no saco ni un segundo para contaros cositas, lo siento. 
Bueno, hoy os enseño otra de las cosas que hice en fieltro para Leo....bueno, no exactamente para el , en este caso para el coche, jeje.

Hi! Sorry but I'm so busy I don't have time to tell you about my things. 
Today I show you another craft I did for Leo, well not exactly for him, but for my car, hehe

Lo llevo detrás colgado, queda claro que tenemos varios pasajeros a bordo, no?
I hanged it at the back of my car, so it's clear we are several passengers on board, isn't it?


Espero que os guste. Un besito y hasta la proxima entrega.
Hope you like it. Kisses and till next time.

sábado, 15 de agosto de 2015

Scrapbooking: album fold

Hola de nuevo!
Hoy en el Canastico estrenamos algo bastante diferente: vamos a empezar con scrapbooking! jeje
Y para empezar este mini-album tan mono que vi en youtube y me encantó la idea. Este es el resultado...

Hi again, today I'm going to show you something quite different: let's start scrapbooking!
The first thing I've done is this mini-album so cute. I saw it in youtube and I loved the idea, This is the outcome....


Pero como con fotos no se puede explicar muy bien aqui os dejo un enlace a un video donde os muestro el interior del album:
 But I can't explain it in photos, so here you have a link to a video where I show you the inside:

                                       
                                       http://www.youtube.com/watch?v=ClwE_Tm6a4k

Como veis de momento esta sin decorar por dentro, ahora solo me falta encontrar las fotos adecuadas, ya os enseñaré como queda al final.

El tutorial que segui esta genial, superdetallado, y lo teneis en youtube aqui: Craftingeek: https://www.youtube.com/watch?v=0OsQEgB0Z30

Muchisimas gracias Craftingeek por compartir, y espero que os haya gustado.
Hasta pronto!!


As you can see it's incomplete inside, I have to find the right photos...I'll show you it finished.

The tutorial I followed is great, with every detail, and you have it in youtube here:
Craftingeek: https://www.youtube.com/watch?v=0OsQEgB0Z30

Thank you so much Craftingeek for sharing, and I hope you liked it.
See you soon!!


viernes, 29 de mayo de 2015

¿Quien duerme aquí? / Who sleeps here?

Hola, ahora que tengo al peque dormido aprovecho para enseñaros otra cosita, jeje.
Bueno, esto es un detallito que hice para la puerta de su habitación. Lleva una tira de velcro en la nube, por detrás, para poder pegarlo fácilmente en la puerta de su habitación. Espero que os guste.


HI! Now that my baby is sleeping I'm going to show you another thing. This is something I did to hang on his bedroom's door. It has some velcro in the cloud, at the back, so you can stick it easily on the door. I hope you like it!


domingo, 26 de abril de 2015

Mi gran proyecto / My big project

Hola a todos de nuevo,
Ante todo disculparme por este parón sin preaviso, pero tengo una buena excusa, jeje.
He estado últimamente muy ocupada trabajando en el gran proyecto de mi vida: Leo. 


Leo llegó a finales de Diciembre y ha sido toda una revolución en nuestras vidas, pero una revolución de las buenas!
Tras nueve meses de espera al fin pudimos tenerle en brazos, y cada día que pasa es mejor que el anterior, nos conocemos mas y estamos mas a gusto.
Al fin pude comprobar como la típica frase que te dice todo el mundo de "es duro pero compensa" es totalmente cierta.
Y bueno, aunque ahora tengo bastante menos tiempo para mis cositas, como el blog, todavía tengo que escaparme algún rato para enseñaros todo lo que le fui haciendo al peque durante el embarazo, desde chupeteros hasta el móvil de la cuna en fieltro.
Así que espero poder encontrar huecos para iros mostrando cositas...pero eso será en la próxima entrega...
Hasta pronto!!


Hi everybody. First of all I wanted to apologize for this unexpected halt, but I have a really good excuse. I've been working in the big project of my life: Leo.
Leo came at the end of December and he's been a revolution in our lifes, but in a good way of course!
After nine months waiting him, finally we could hug him, and each day is better than the last one and we learn a lot from each other.
I didn't believe it nonetheless I realised that the tipical sentence everybody tells you about babies ("It's hard but compensates) is completely true.
Now I don't have much time  but I hope I can find some to show you what I did for my baby during pregnancy, from  baby's pacifier clasp to the mobile for the crib. 
But this will be in the next post...

see you soon!


lunes, 22 de diciembre de 2014

Regalo economico para estas navidades / A cheap gift idea for Christmas

Bueno, como estamos en Navidad os quería enseñar un regalo muy económico, que tal como esta la cosa no viene nunca mal alguna idea, ¿no?

As we are in Christmas time I wanted to show you an idea to make a real cheap gift, what is always a good idea, isn't it?

Yo se lo hice a mi pareja para nuestro primer aniversario de boda, pero puede servir igual para cumples, navidades o lo que se quiera
I did it for my husband in our first wedding anniversary, but it can be handy for birthdays, Christmas or whenever you want!


Lo primero es hacer una cajita mona acorde con el acontecimiento. En mi caso opté por este corazón echo con cartulina roja.
Yo saqué la idea y el patrón aquí:
http://manualidadesparaninos.biz/cajita-de-corazon-para-san-valentin/


The first thing to do is a nice little box appropriate with the event. In my case I chose this heart made of red board. (the step by step link is above)

Y dentro...
And inside....


... pues unos tickets muy especiales!! 

...some very special tickets!


Un ticket es para felicitar la ocasión y otro para poner unas instrucciones (cuantas veces se puede utilizar cada ticket, cuando caducan....etc)

One ticket to congratulate the event, another to print some instructions (how many times you can use each ticket, until when you can use them, etc)


Y luego, imaginación al poder. Dependiendo para quien sea el regalo pues se pueden hacer tickets de para una cena romántica, una tarde en el cine, una semana sin tareas domésticas, un masaje...

And then power to the imagination. Depending on who is the present for you can make tickets for a romantic dinner, an evening in the cinema, a week without chores, a massage...


Como era nuestro primer aniversario yo hice 12 tickets, uno por cada mes juntos, jeje

As this was our first anniversary I made 12 tickets, one for each month together, hehe.

¿Os gusta la idea? 
Do you like the idea?


¡¡¡¡¡Felices fiestas para todos!!!!

Merry Christmas for everybody!!!!!!


lunes, 24 de noviembre de 2014

Broche amapola rosa / Pink poppy brooch

Buenos dias! Os presento otro broche de fieltro para adornar esas chaquetas de invierno tan tristes! jeje

Good morning!  Here you have another felt brooch to decorate those boring winter jackets!!


Compuesto por varias capas de fieltro superpuestas y abalorios encima, se puede hacer en el color que más te guste

It's made of several felt layers superposed and beads on the top, so it's easy to find the colors that fit you.


Y  a mi me vino genial para abrochar esta chaqueta que no tenia cierre, pero ya con este fresquito que hace apetece ir un poco más tapadas no?

It was very handy for me to fasten this jacket which didn't have any fastener, and it's really cool outside today, isn't it?


Bueno, espero que os haya gustado, y hasta la proxima!!
I hope you liked it. See you soon!!


viernes, 14 de noviembre de 2014

Un poco de decoración / Little decoration ideas

Buenos dias!! Siento tardar tanto en escribir pero cuesta encontrar tiempo para todo! 
En fin, hoy os quería contar un proyecto que hicimos hace un par de meses para decorar la casa, concretamente la pared de la entrada.

Hello! I'm sorry it has taken so long for me to write, but it's difficult to find time for everything! Anyway, today I wanted to show you a project I did a couple of months ago to decorate the house, the entry wall.

Como el pasillo es estrechito no nos cabe un mueble, asi que decidimos decorar solo la pared para no ocupar espacio.
As the hallway is a bit narrow, we couldn't buy any furniture, so we decided to decorate just the wall in order that the space remain the same.


Primero recorté papeles del tamaño de los marcos disponibles (del Ikea, modelo Ribba, son baratitos) y los pegamos en la pared para ver la distribución que queriamos. 

First I cut papers the same size as the frames (from Ikea, Ribba, they are very cheap!), and we stuck them on the wall to check the distribution we wanted.


Y tras una visita al Ikea para comprar los marcos y una buena sesion de revisión de fotos para elegir las que queriamos, las imprimimos y este es el resultado!

And after a visit to Ikea to buy the frames and a photograph revision sesion to choose the ones we wanted, we printed them....and this is the result:


Además, no taladramos la pared, puesto que colgamos los cuadros con estas "chinchetas" que venden que solo necesitas un martillo para clavarla.

Besides, we didn't have to drill the wall, because we hanged them with that kind of "tacks" that are sold to hang frames, so you only need a hammer.


Me encanta tener mis fotos preferidas siempre tan a la vista...a vosotros no?

I love to have my favourite photos always visibles, don't you?

Bueno, hasta la proxima!!
Well, see you soon!

martes, 30 de septiembre de 2014

Cuadro de Marina / Framed felt board for Marina

Bueno, en la entrada anterior os enseñé la supertarta de Marina. 
Pues todavia me quedaba por enseñaros en cuadro que le hice, en fieltro y con su nombre...aqui esta!

Well, in my last post I showed Marina's super-cake. But I still have to show you this framed board I made for her too, it's all made in felt and with her name on it...here it is!


Que os parece? Las fotos no son muy buenas porque me reflejaba mucho el cristal del cuadro...
Do you like it? Sorry about the photos, I didn't know how to take them because of the reflection in the glass of the frame...


Hasta la proxima!
See you next time!

miércoles, 17 de septiembre de 2014

Una Supertarta para Marina / A super-cake for Marina

Bueno, ya estamos aquí despues de las vacaciones, con muchos nuevos proyectos en marcha.
Ayyy, después de tantas tartas con aviones y ositos ya tenía yo ganas de preparar una tarta para niña, y aquí esta al fin:

Hi, I'm back after this long holiday break, with a lot of new projects in mind.
After so many diaper cakes with planes and bears I really wanted to make a girl's cake, and here it is at last:


Os presento la supertarta para Marina,  la peque de mi amiga Laura. Yo creo que es una de las que más me gusta de las que hice hasta ahora, en tonos rosas y lilas, y con mariposas en relieve!

I want to show you Marina's super-cake. I think this is my favourite cake until now, in pink and lilac, and with butterflies all around it!


Además, la muñequita de arriba es para comérsela, no os parece?

Moreover, the little doll on top is soooo cute, isn't it?


Es una de las grandes, lleva muuuchas cosas incluidas: esponja, biberón, chupete, geles, champús, aceites, termo, baberos, calcetines...etc.

This is one of the big cakes, so there are many things included: a sponge, a  baby bottle, a pacifier,  shower gel, shampoo, baby lotion, a thermos bottle, bibs, socks...


Y como toque especial el babero bordado a mano a punto de cruz por mi amiga Maria, ya que era un regalo de las dos...que bien lo pasamos montandola juntas!

And as  a special detail, the hand embroidered bib by my friend Maria, because this was a present of both of us...we really enjoyed making it together! 


Bueno, espero que os haya gustado. 
Hasta la próxima!

Well, I hope you liked it.
See you! 

miércoles, 9 de julio de 2014

Cuadro en fieltro para recién nacido / Framed felt board for a newborn

Hoy os voy a enseñar una cosa nueva que hice por encargo de mi amiga Laura. No podia ser una tarta de pañales,  porque había que enviarlo muuuy lejos, en avión, así que pensamos que un cuadro podria encajar.

Hi! Today I'm going to show you a new thing that my friend Laura ordered me. It couldn't be the diapers cake, because it had to travel veeery far, by plane, so we thought to make a felt board.

En cuanto me dijo que iba para Canarias pensé en dos cosas: avión y palmeras, y aquí tenéis el resultado:

She told me it was a present to send to Canarian Islands, and two things came to my mind immediately: a plane and palm trees, so here you have the outcome:


Las letras estan acolchadas y coldadas con pincitas de la cuerda, y las palmeras también estan en relieve, pero con mis fotos no se ve muy bien...
The letters are padded and they are hanged with little clothes pegs on the rope between the palm trees, which are also in relief, but maybe you can't notice it in my photographs, they are not very good....

Y ya tengo dos proyectos más de cuadros para bebe! Muy pronto os los enseñaré. 
And I have two more felt board proyects for babies! I'll show them very soon.